Search Campaign Setup (Walkthrough)
The Google Search Network is an awesome channel to extract high return on investment (ROI) due to the high level of control available to search advertisers. It is therefore critical for us as marketers to properly configure our campaigns to achieve our business objectives.
To be efficient, you only need to set up a Google search campaign once. For subsequent search campaigns, you can simply load your campaign settings that you have configured previously, or copy and paste campaigns which is like duplicating campaigns in Facebook Ads. This can save you precious time (provided all your settings are good).
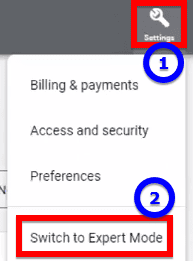
We are doing this in Expert Mode, so if you are still in the Smart Mode, you need to switch to Expert Mode.
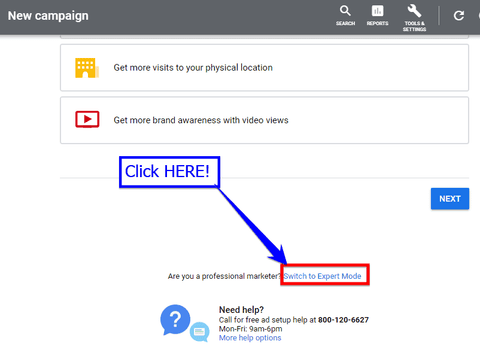
You need to find and click the link that says 'Switch to Expert Mode'.
There are a few ways to create a campaign. One of them is via the dashboard which is the home screen of your Google Ads account. Click on the ‘NEW CAMPAIGN’ button to create a new campaign.

Another way is to click Campaigns, then click the white cross enclosed in blue circle. This will also lead to the campaign setup flow.

You will be asked to select a campaign goal.

Google will provide you with guidance depending on which goal you select.
Does the goal you choose affect the configuration of your campaign or bid strategy?
It will affect your bid strategy! Certain goals will allow you access to certain bid strategies and other goals may prevent you from utilising certain bid strategies. You need to know more about the goal and what are the available bid strategies for that specific goal.
For me, the most common flow is Leads, so let us just select Leads.
Next, you need to choose your campaign type – select Search.

For this walkthrough, we are only dealing with the Search campaign type.
Next, select your goal method. There are several ways to reach your goal and mine this time it is Website visits.
It’s also good to know:
- Campaign setup for Lead Form Submissions
- Campaign setup for Phone calls
- Campaign setup for App Downloads

Select 'Website visits' then click continue.
Then we will be brought to the campaign settings screen.

By default, both check boxes in ‘Networks’ are checked. We should uncheck both.
Reason:
- We do not include Google Display Network because we are running a Search campaign.
- The keyword matching does not work outside of Google, and that is why we do not include Google search partners.
By doing these, we can focus our limited budgets solely in the Search Network. Especially when our clients have tight marketing budgets, and we are configuring our campaigns with judicious use of match types and negative keywords. Well, they only apply in the Google SERPs, and not their search partners!
Next, click ‘Show more settings’.

You can specify a start and end date especially when you’re working with clients whose contract ends at a certain date, you definitely do not want to exceed that date.

Otherwise, you do not need an end date.
Next is your tracking template…

The ‘Campaign URL options’ is useful if you’re using a third-party tracking system. Otherwise, you can forget this.
Next up is the Dynamic Search Ads setting. We do NOT use this.
Dynamic Search Ads (DSA) target relevant searches automatically based on your website, then use headlines automatically customised to people's actual searches. This setting determines what domain, language and targeting source to use for your DSA. It is basically using Artificial Intelligence to help you create ads.

To create a DSA, you’ll need to create a dynamic ad group in the next step. We’ll skip this because we want full control over our ads and we will be creating Responsive Search Ads (RSA) instead.
Next is our Ad Scheduling…

We normally set this after we have statistically significant data on the hours that we are most likely to get conversions. For now, we can leave it as default.
Next, we get to choose our location and target market…

Choose Singapore as a Location if you want your ads to show in the whole of Singapore. For ‘Location options’, we normally use the default settings. Then choose the Language that your customers speak.
If you want to drop a pin, select ‘Enter another location’ and ‘Advanced search’.

Then you will see the ‘PIN MODE’ screen…

This is useful if you run a location-based business and want to reach out to customers near you e.g., within a 5km radius. Because customers do not like to travel too far to patronise your store. For multiple location businesses, you can enter multiple target locations.
Next, we come to audiences…

As a typical setup for a Search Ads campaign, you can leave Audiences blank first.
Next, we set our budget…

Take note that this is Daily Budget. Set an affordable number for you e.g., $30 per day.
Next, we come to bidding…
By default, Google wants us to focus on ‘Conversions’ by setting a target cost-per-action (CPA). This is a possible bid strategy if you have target CPA data. But when I am just starting a new campaign with no conversion data, I want an extraordinarily strong control over my cost-per-clicks. Because without control, my cost will go too high per conversion which can lead to negative returns.

So, I would rather focus on clicks and set a maximum cost per click (CPC) bid limit. In this example, let’s just set the max CPC bid limit at $1.50.
After this campaign has accrued statistically significant conversion data, I should come back here and choose to focus on Conversion (with Target CPA) or maybe even focus on Conversion value (with Target ROAS).
But for the time being, I'll stick to Maximise clicks bid strategy where I am telling Google to give me as many clicks as possible for the my set budget and max CPC.
Next up are conversion settings…

We can leave this as default first.
Then comes Ad Rotation…

I would choose ‘Do not optimise: Rotate ads indefinitely’ because I want to split test my ads manually. Google will not do any optimisation and my ads will run fifty-fifty. Obviously, I need two ads and let them accrue statistically significant clicks before deciding on the winner – based on click-through and conversion rate. I will then pause the ad with lower performance.
If you are worried about forgetting to pause the under-performing ad, you can leave the setting as default – which is to let Google optimise for you!
Next comes the Ad extensions…

These extensions are based on your business. You can leave this blank first then come back to it later after your ads are approved. Click ‘SAVE AND CONTINUE’ then you will be brought to the Ad Group setup.